|
This Spiced Apple Cake may just be my favorite homemade hack ever! About once a year I go to the effort to make a homemade Sour Cream Apple Pie. It’s laborious and glorious all swirled together. So what’s the problem? The meticulous process of peeling and slicing apples can be SO daunting!
Spiced Apple Cake in 30 minutes ::If it weren’t so time consuming, I know I would make it more often – but I just can’t bring myself to make it any more frequently. HOWEVER – this cake ticks all the boxes. The flavors of apple and creamy tanginess and warm Fall spices are all packed into this Spiced Apple Cake with Cream Cheese Frosting and it all comes together in under 30 minutes.        
Cinnamon – Sugary apples and that glorious tangy cream cheese frosting – so similar to my Apple Pie without all of the painstaking effort. The Trick to an Easy Spiced Apple Dessert ::Here’s the trick, take one Granny Smith Apple (core removed) and put it, peel and all into the food processor. Once you’ve pulsed it to a fine chop, set it aside and assemble the rest of the cake ingredients. No peeling, no slicing, just one swift whir and the rest is just dump, stir, pour and bake! So quick and simple. 
Cream Cheese Frosting ::While the cake is baking and cooling, whip up the Cream Cheese Frosting. They key to fluffy cream cheese frosting is to wait until the cake is COMPLETELY cooled before icing.  
Once the cake has cooled completely, gently frost the cake starting with half of the cream cheese frosting. This prevents the tender Apple Spice Cake from sinking under the weight of a heavy glob of frosting.    
This Cake — the BEST of Fall on a plate!Oh my – cream cheese frosting and the apples and ginger and spices?!! It’s the only cake I’ll ever need! The bits of finely chopped apple, some apple juice and a combination of spices mimic my favorite pie so well! I can’t say I’ll never make that pie again, but I can promise – this Apple Spiced Cake makes getting to those flavors so much easier!
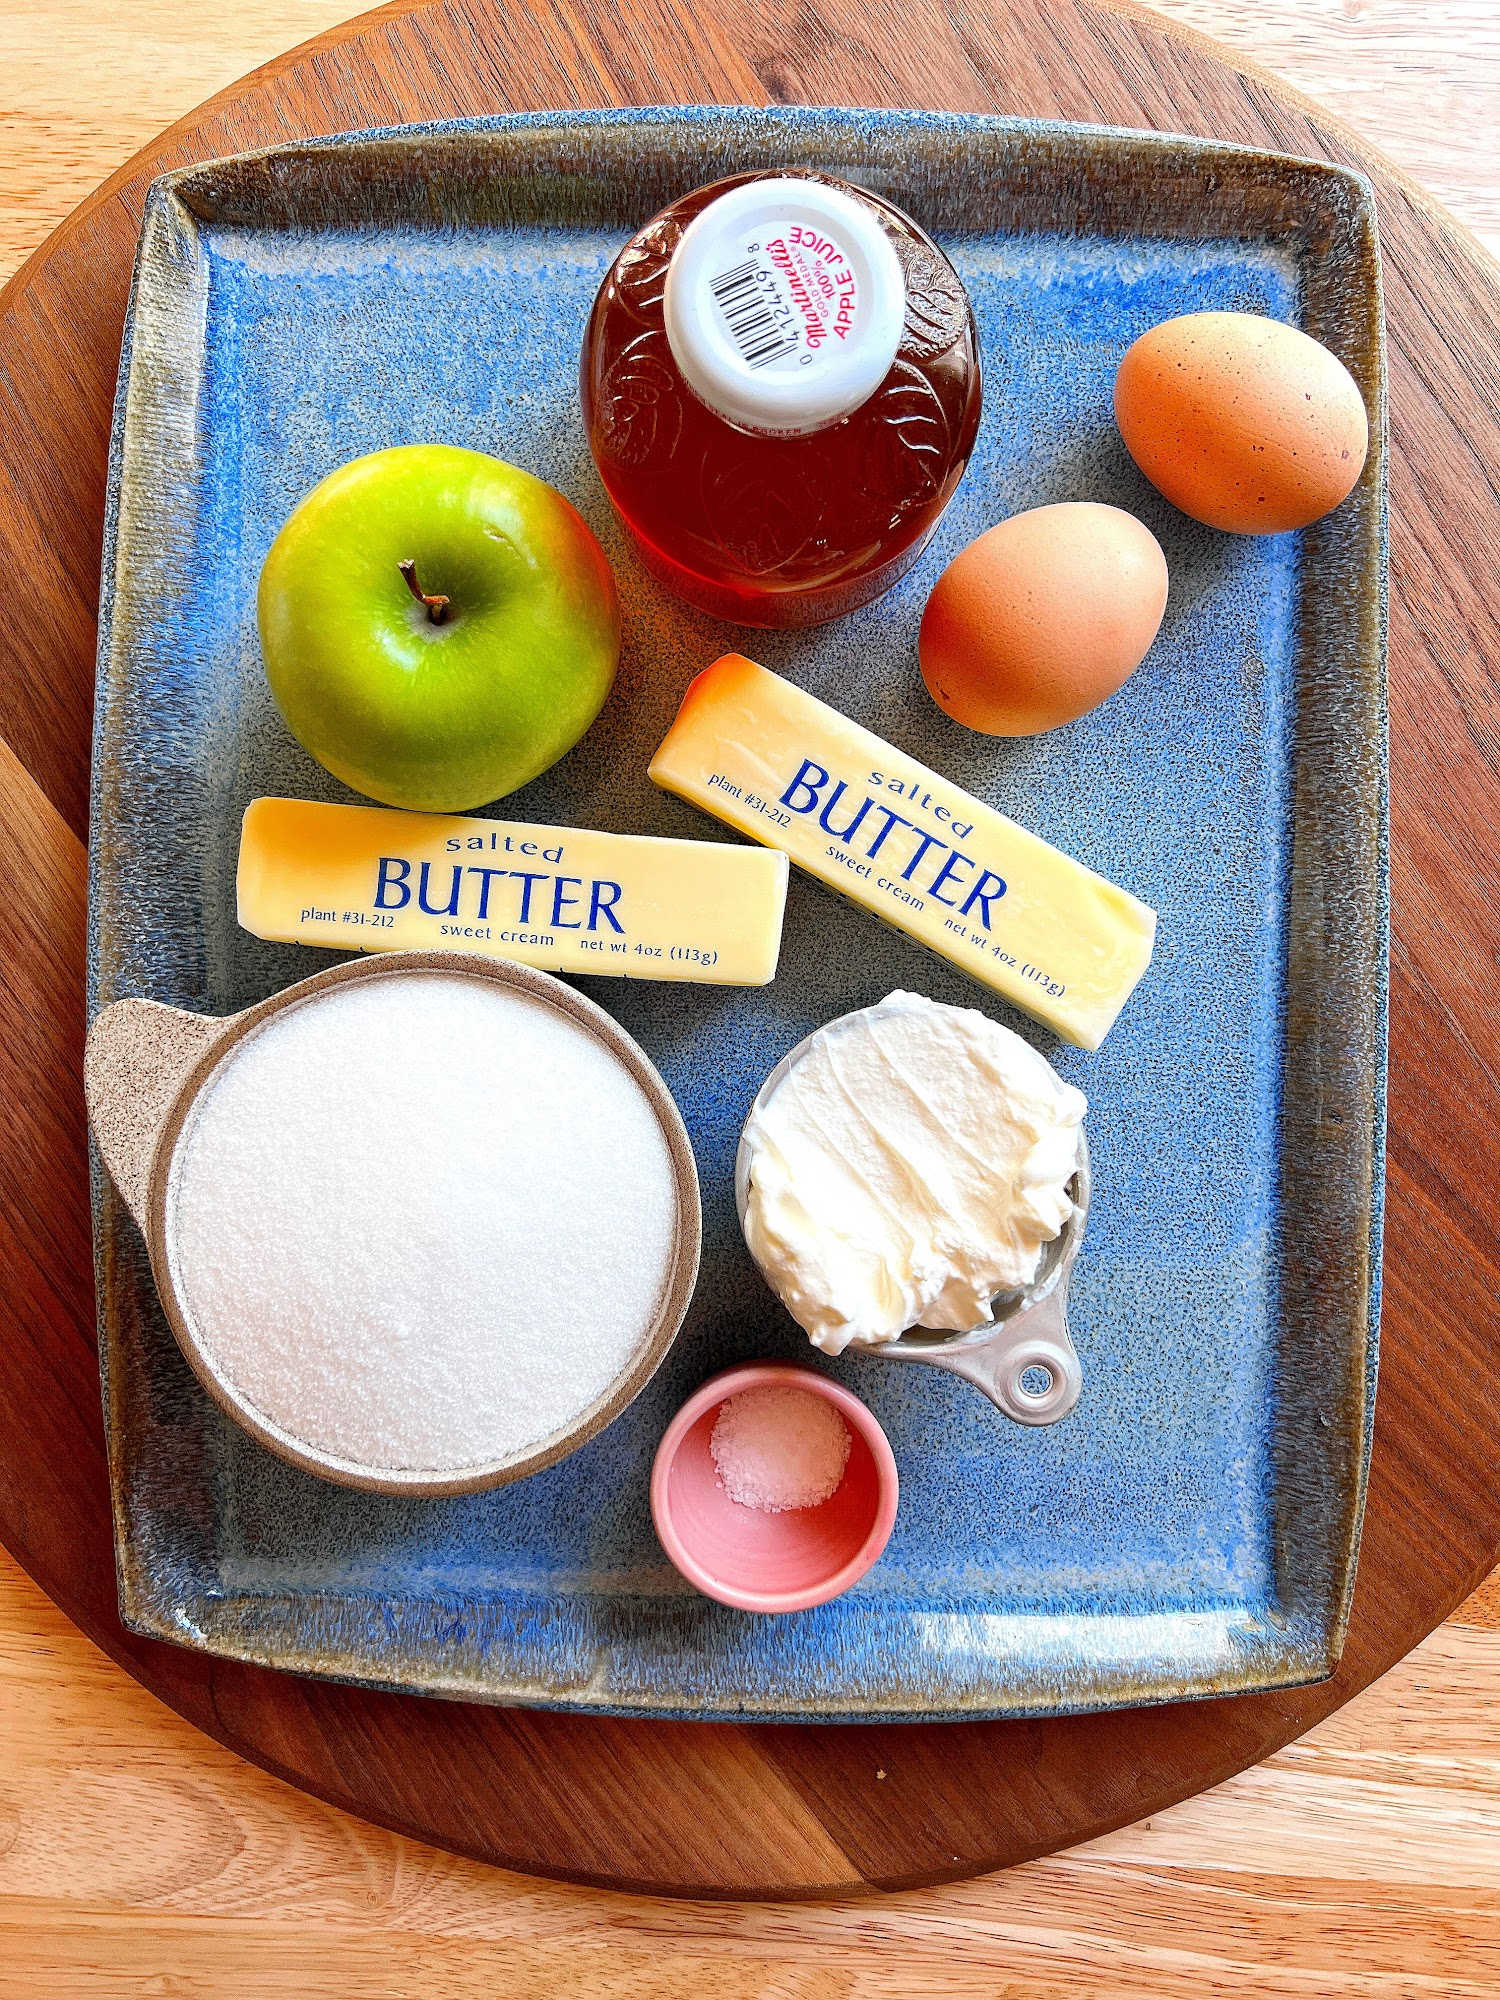
Spiced Apple Cake with Cream Cheese Frosting(spiced apple cake ingredients)
(cream cheese frosting ingredients)
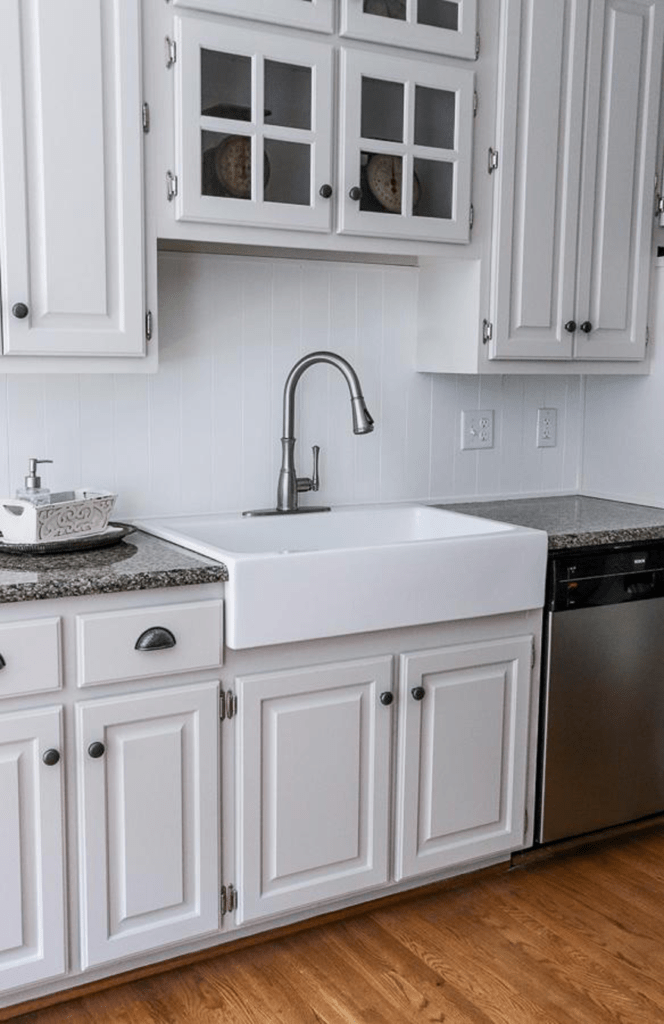
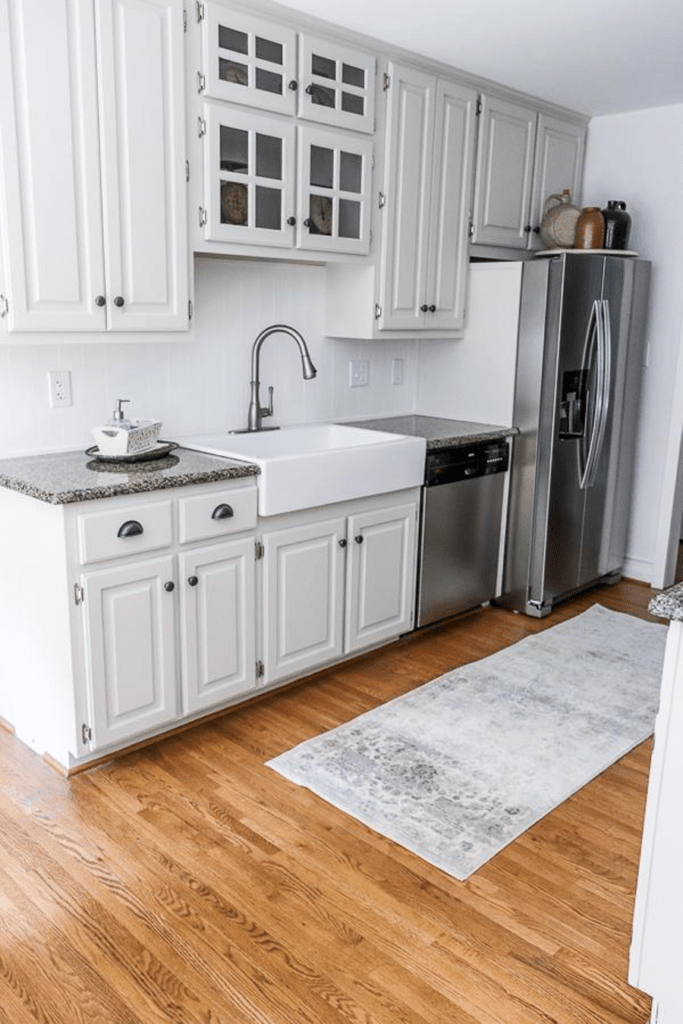
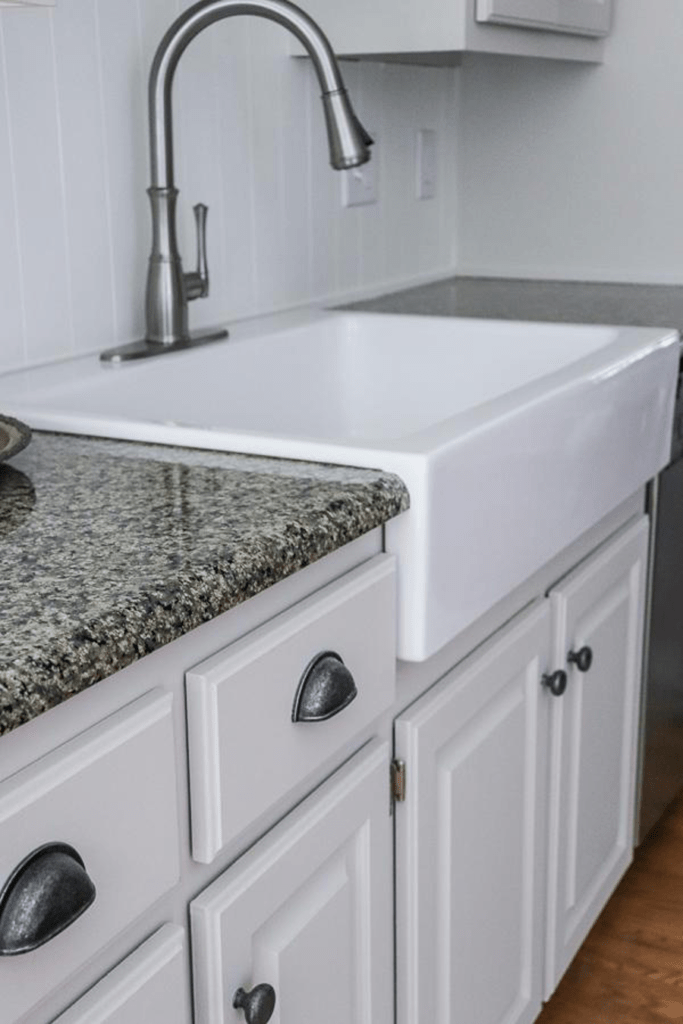
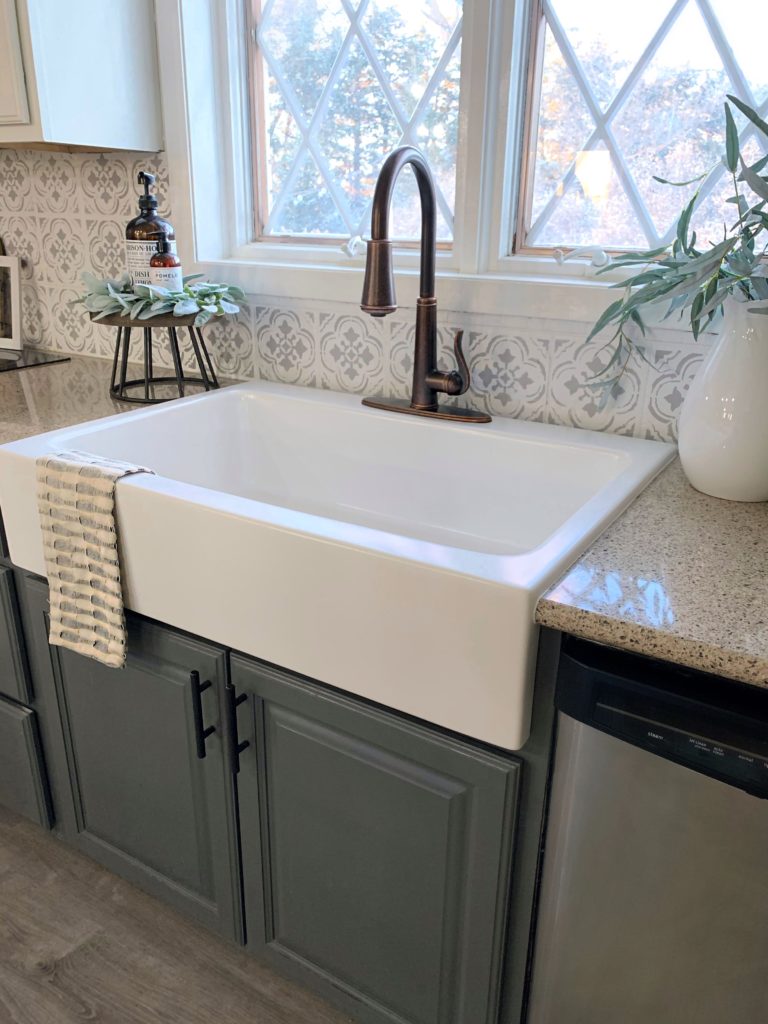
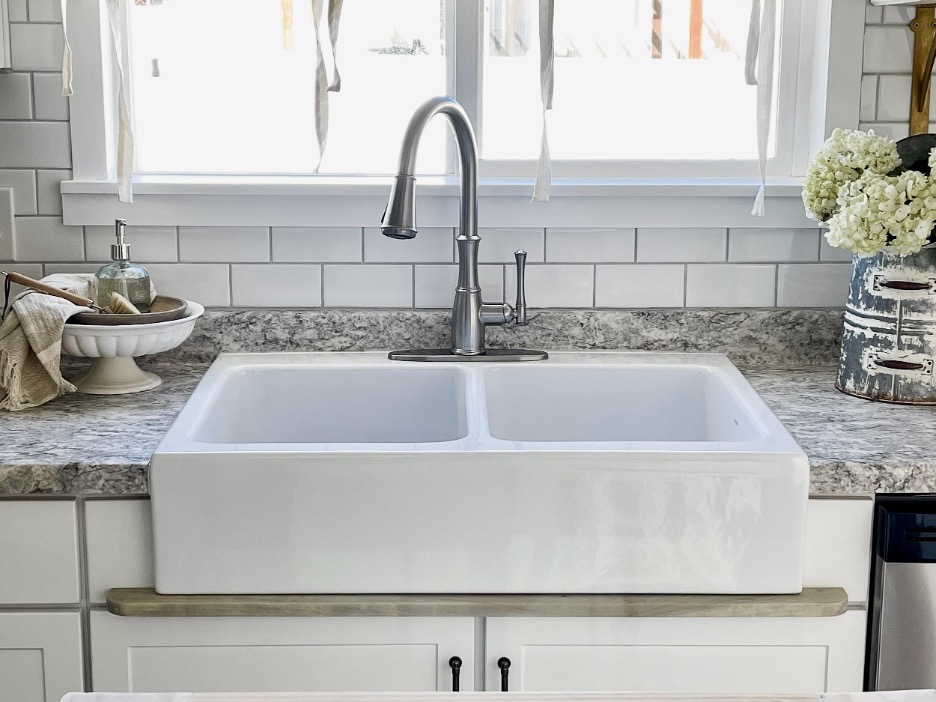
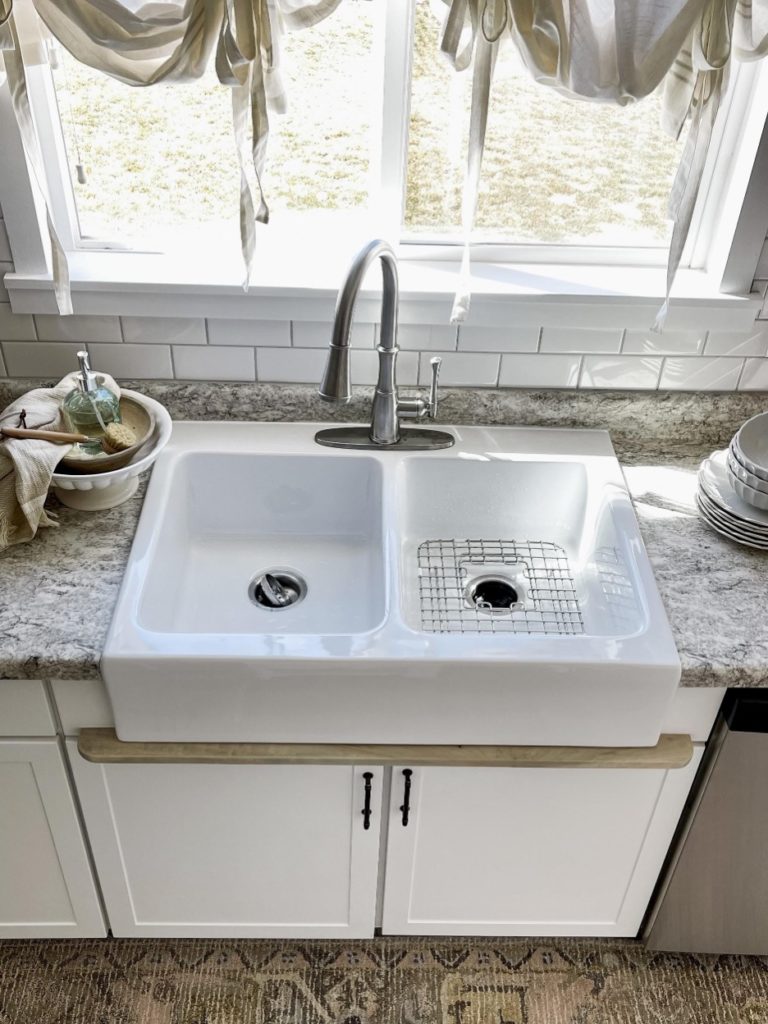
(spiced apple cake instructions)Preheat oven to 350°. Prepare a 15 1/2” x 10 1/2” x 1” rimmed baking pan by buttering or spraying with nonstick cooking spray. In a medium saucepan, over medium flame, combine sugar, butter, apple juice and chopped apple. Bring to a simmer, stirring until the butter is melted. Remove saucepan from the flame and add sour cream, stirring to combine. Add flour, salt, baking soda and spices, stir vigorously to combine. Whisk in eggs, continuing to stir vigorously (the prevents the raw eggs from scrambling). Pour batter into the prepared baking pan and bake 15 minutes or until the center is set and slightly golden in color. If you have an instant read thermometer, the cake is done when it registers 190°-195°. Allow can to cool completely (at least 1 hour) before icing. (cream cheese frosting instructions)To prepare the cream cheese frosting combine all frosting ingredients in a medium mixing bowl and beat, using a hand mixer, on HIGH speed until evenly incorporated and no lumps remain (approximately 2 minutes). Once cake is cooled, spoon 1/2 of the frosting over the cake and continue adding spoonfuls to get to the desired thickness. Serves 12 Not only am I currently drooling over this cake – check out the GORGEOUS Sinkology sink I’m currently loving!
The post Spiced Apple Cake with Cream Cheese Frosting appeared first on Sinkology. Via https://www.sinkology.com/blog/spiced-apple-cake-with-cream-cheese-frosting/
0 Comments
Many homeowners today want the best of both worlds: everyday convenience and a lasting premium look. If you dream of a high-end look but can’t imagine spending much time on a complete kitchen renovation project, Sinkology Quick-Fit Fireclay Kitchen Sinks are for you. The Sinkology ELEVATE Collection of Quick-Fit Fireclay Kitchen Sinks was created to give our customers the satisfaction of a simpler kitchen upgrade with the elegance of apron-front style. Each fireclay farmhouse sink in the collection was designed to fit effortlessly into any kitchen, making them ideal for those who are both short on time and long for an impressive upgrade. With Sinkology Quick-Fit Fireclay Kitchen Sinks, you don’t need to redo the entire kitchen, you can just trade out your existing sink with ease. It might come as a surprise to you that fireclay sinks can be simple to install. After all, fireclay farmhouse sinks are typically heavy, given their incredible density, and require a lot of countertop and cabinet modifications to accommodate the apron-front style. But anyone can feel confident installing our Quick-Fit Sinks thanks to their thoughtful design. In addition to the intelligent retrofit design imagined by our sinkologists that leads to a simpler process, we provide DIY-friendly, detailed instructions to help you replace your existing sink. Not only that, but we’ve also even partnered with the BILT Intelligent Instructions® app to create interactive, step-by-step installation support for your at-home installation project. This combination makes our Quick-Fit Sinks ideal for the busiest homeowners. Sound like you? If so, you’ll need to take an important first step before you take on a Quick-Fit Sink installation project. Find the right fit for your kitchen.To make this project as easy as possible, you’ll want to find a sink that will fit in the space where your existing sink is. Otherwise, you’ll need to make time-consuming (and often tricky to complete) modifications to your kitchen, which completely eliminates the benefit of quick-fit sinks. You’ll want to take both the basin width and depth into consideration and ensure there is adequate space for the apron front. For example, The Josephine 34” Quick-Fit Drop-In Fireclay Farmhouse Kitchen Sink is recommended for 36-inch cabinets, while The Josephine 26” Quick-Fit Drop-In Farmhosue Fireclay Kitchen Sink fits best in 30-inch cabinets. With this in mind, you can easily select the right sink for your space and transform your kitchen in just one weekend project. Below are five steps you can expect to take on in your quick-fit project: 1.You will need to be comfortable removing your existing sink. After making this fast, simple upgrade, you can get back to enjoying your kitchen. Once complete, share a photo of your new Quick-Fit Fireclay Kitchen Sink with us on social @Sinkology with #MyQuickFitSink. For more helpful how to’s, follow us on Facebook, Houzz, Pinterest or Instagram. If you are looking for personalized answers to your questions about your sink installation progress, contact us here. _____________________________________________________________________ If you have any additional questions during your search for the perfect copper, fireclay farmhouse sink or crafted stainless steel sink, our Sinkologists are here to help. Contact us or follow us on Facebook, Houzz, Pinterest, Instagram, or TikTok for more helpful tips and design ideas. The post Quick-Fit Kitchen Sink Installation 101 appeared first on Sinkology. Via https://www.sinkology.com/blog/quick-fit-kitchen-sink-installation-101/   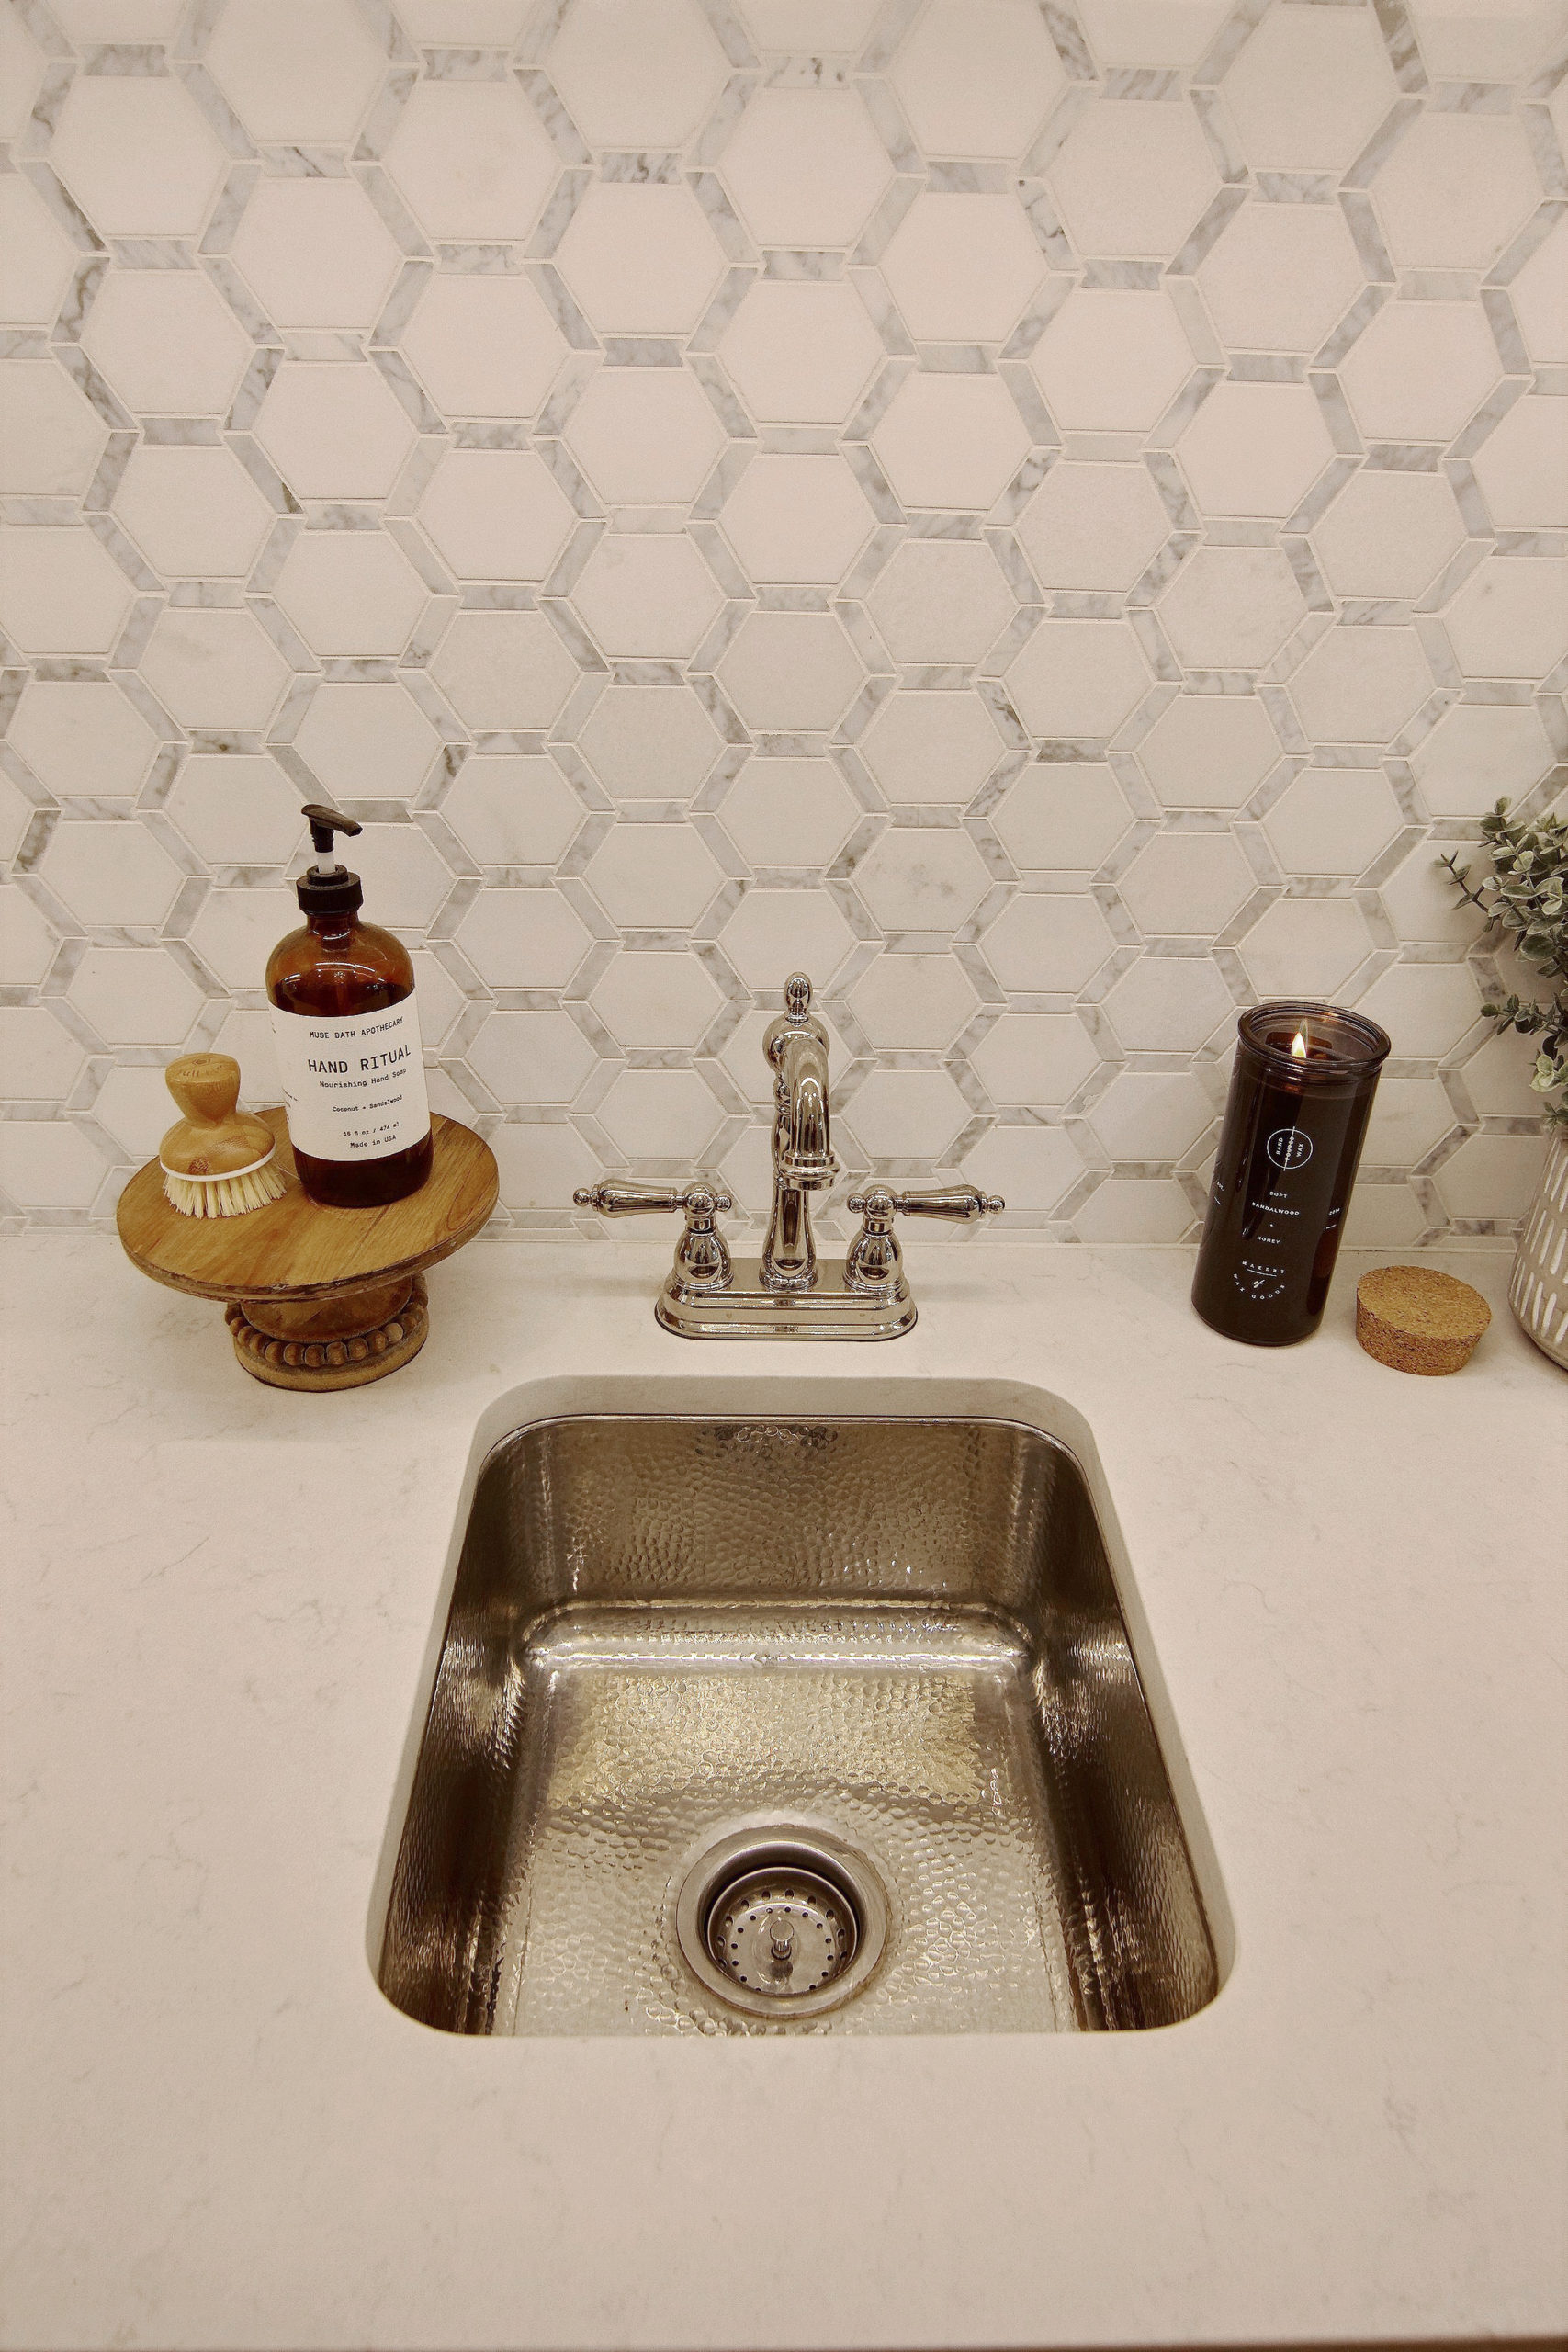
If you have the space for a spare sink, we say “go for it!” Sinkology bar + prep sinks are perfectly sized for wet bars and prep spaces alike. Though smaller than the standard sink, homeowners love the convenience these sinks provide, especially when preparing large meals or hosting parties. Not only do they add functionality to any home, but these bar + prep sinks also make a big impact in spaces of every size, no matter the mounting style. What sets these mounting styles apart? We love drop-in sinks because they make the installation process simpler. Some drop-in sinks even feature pre-drilled holes to make even faucet installation easier. Undermount sinks are great because they sit discreetly beneath the countertop. When choosing a bar + prep sink, we recommend mirroring the mounting style and matching the same material as any nearby sinks for a cohesive look. If you installed these sinks on your own, you’ll be familiar with the steps. We’ve captured a few instructions below to help you get started in this intro to bar + prep sink installation.
For both drop-in and undermount sinks, we recommend beginning with a template made from craft paper or cardboard. Drop-In Sinks: Flip the sink upside down and trace the outside edge. Then, add a second line that is ½” inside your first line. Cut the traced template along the second line. Undermount Sinks: Flip the sink upside down and trace the outside rim. Before creating a second line, determine which countertop offset is preferred. (There’s more information on this in our detailed instructions that come with your sink). Based on your preference, you’ll measure the distance between the edge of the basin and the inside edge of the lip, marking with a second line. Like drop-in sinks, cut along the second line you created. Once the template is created, place it on the countertop, aligning with cabinetry and plumbing connections and marking openings before cutting the countertop. After ensuring that the sink fits snugly in the hole you’ve created, you are ready to install. Drop-In Sinks: Before setting the sink into the countertop, apply a thick bead of Sinkology antique brown or clear neutral cure 100% silicone around the hole on the countertop. Then, install hardware by placing the notched end of all bolts into the keyhole slots. Once complete, you’re ready to lower the sink into the countertop, being mindful that the bolts enter without interference. After the sink is placed, turn the claws out 90 degrees so they can grasp the underside of the countertop and tighten. Undermount Sinks: Apply clear or Sinkology antique brown neutral cure 100% silicone on the rim of the sink and mount with mounting hardware. After confirming the sink is mounted flush with the countertop, apply a thin bead of the 100% silicone cure to fill any gaps. We hope today’s introduction has helped you get a general idea of what a bar + prep sink installation project might look like. For more helpful how to’s, follow us on Facebook, Houzz, Pinterest or Instagram. If you are looking for personalized answers to your questions about your kitchen renovation project, contact us here.
_____________________________________________________________________ If you have any additional questions during your search for the perfect copper, fireclay farmhouse sink or crafted stainless steel sink, our Sinkologists are here to help. Contact us or follow us on Facebook, Houzz, Pinterest, Instagram, or TikTok for more helpful tips and design ideas. The post Bar + Prep Sink Installation 101 appeared first on Sinkology. Via https://www.sinkology.com/blog/bar-prep-sink-installation-101/ 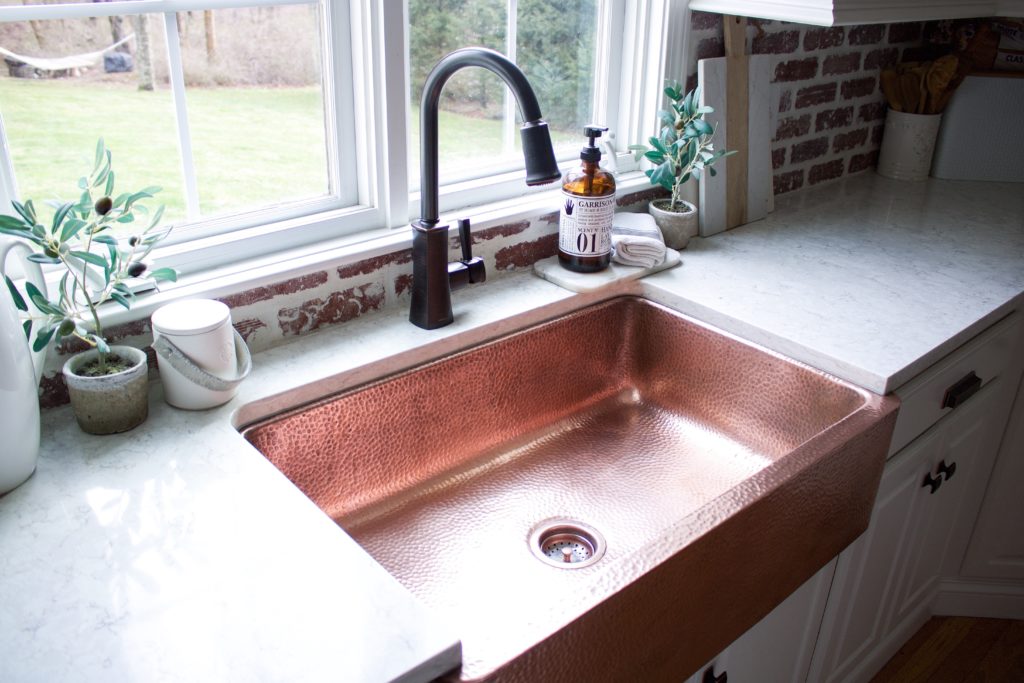 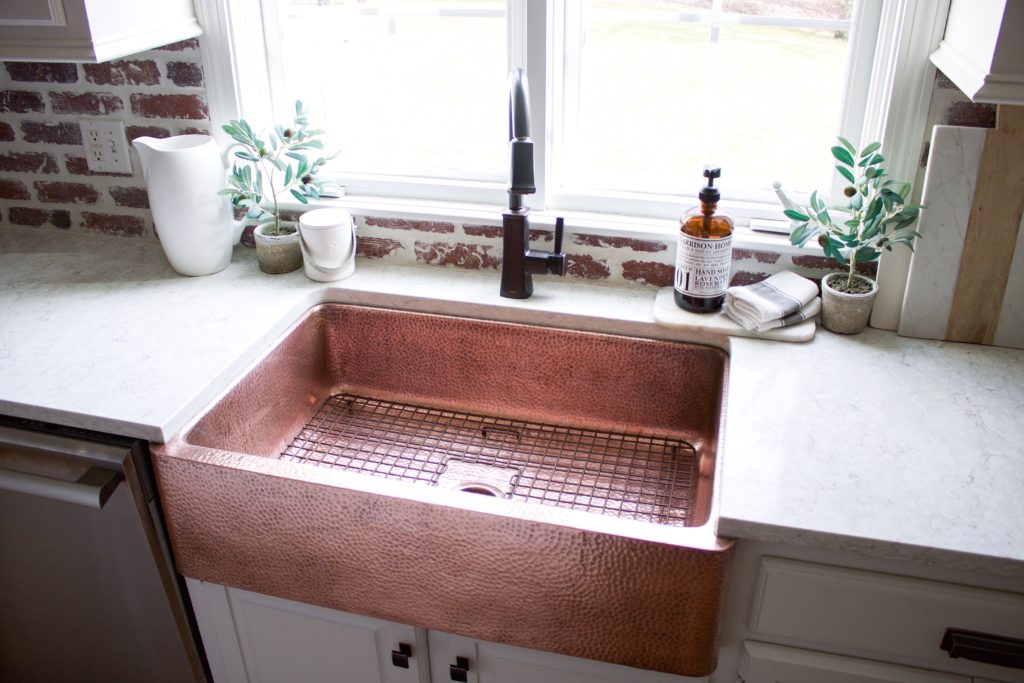 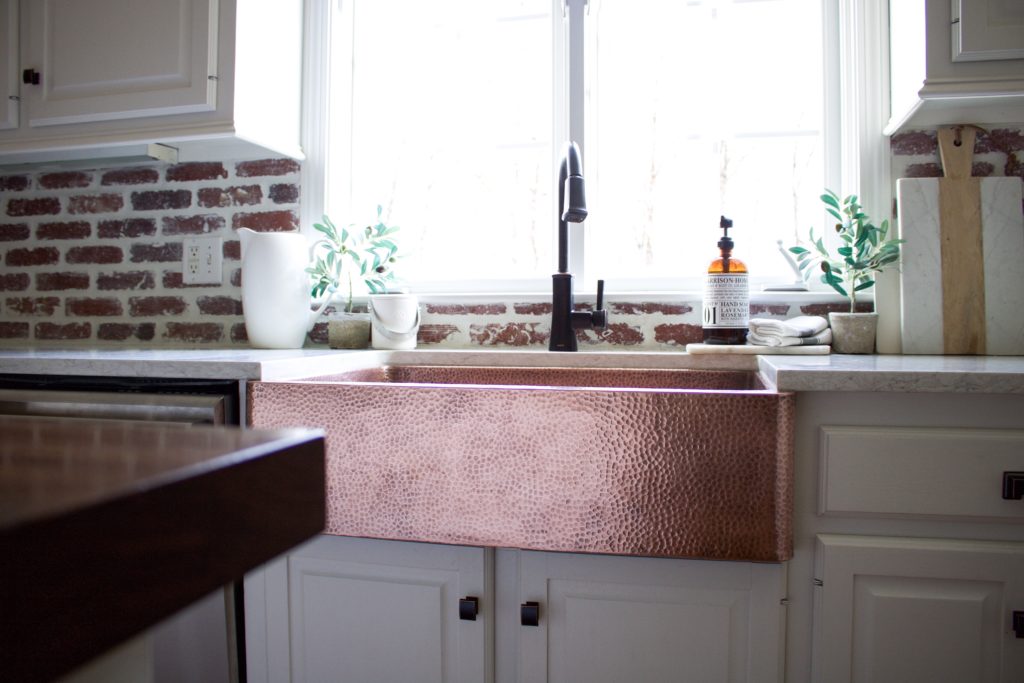
It’s easy to fall in love with Sinkology undermount kitchen sinks. There’s something so striking about the seamless look of a flush-to-counter finish. But it’s important to know that these sink styles require a bit more effort and expertise to install than their quick-fit and drop-in counterparts. But we believe that the sleek finish makes it worth the effort. Whether you call in the professionals or take this project on your own, today we break down the process you can expect to install your Sinkology copper or stainless steel undermount kitchen sink. Check out our blog page for more information on undermount fireclay farmhouse sink installation information. Before you kick off your project, it’s important to note that Sinkology undermount kitchen sinks do not include mounting hardware. Be sure to talk with your countertop manufacturer about the approved mounting hardware and method. 1. Create a template.For an undermount kitchen sink, you’ll need to choose your preferred countertop offset. (More on that in our detailed sink instructions.) Once you’ve made that decision, you’ll flip your Sinkology kitchen sink upside down on cardboard and trace along the outside rim. Then, you’ll measure the distance between the edge of the basin and the inside edge of the lip, adding a second line inside the first according to this measurement. To complete, cut along the second line. 2. Prepare your space.Place the template on your kitchen countertops and cut to size. This is where professional support may be helpful! 3. Secure the sink.Trace the rim of the sink with clear or Sinkology antique brown neutral cure 100% silicone and mount with the proper mounting hardware. Remember, your Sinkology undermount kitchen sink won’t include mounting hardware, given the wide range of mounting surfaces. Don’t forget to talk with your countertop manufacturer to ensure you have the correct mounting hardware for a successful installation. 4. Complete your project.Once the sink is in place, it’s time for the finishing touches. Use plumber’s putty to install the drain. For more information on this step, check out our Kitchen Sink Drain Installation 101 post on our blog. Lastly, fill in any gaps between your new sink and countertop by applying a thin bead of Sinkology antique brown or clear neutral cure 100% silicone.
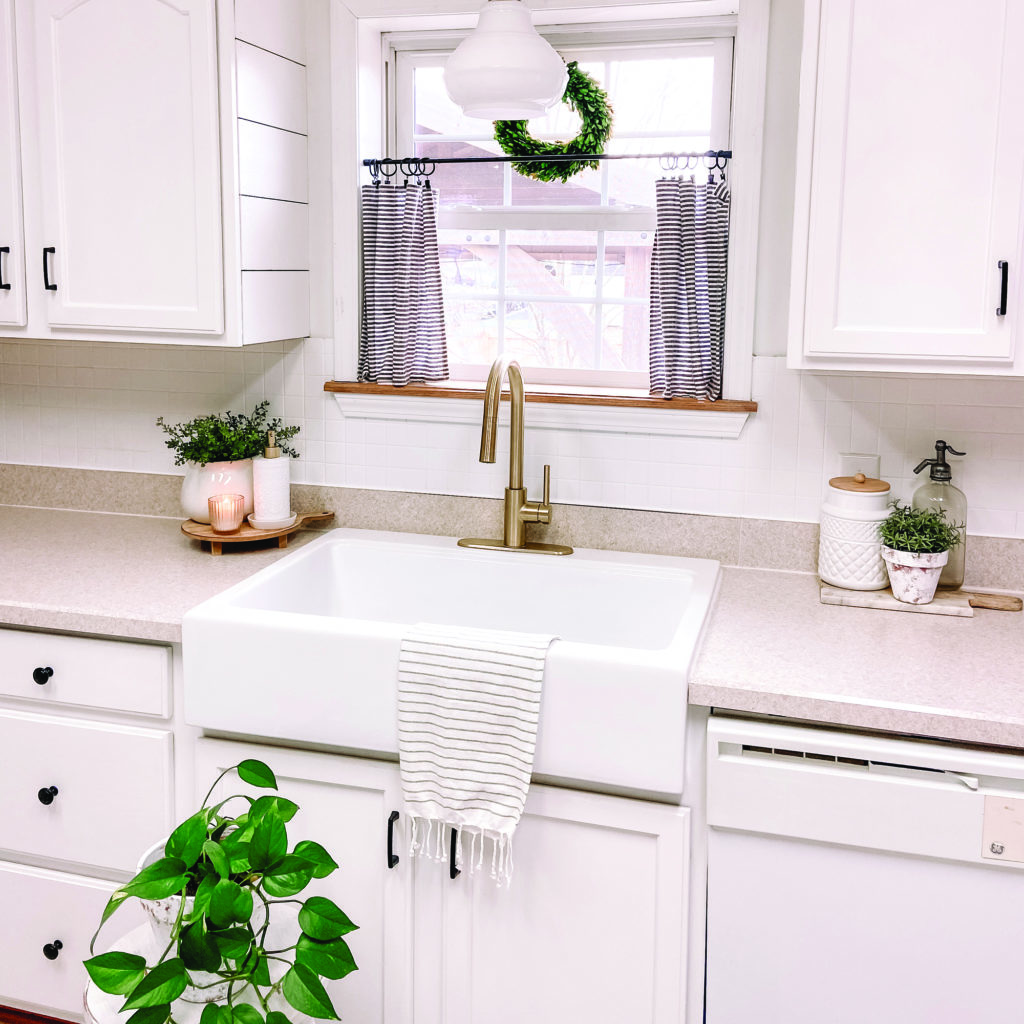
Now that you have a good idea of what you can expect in an undermount kitchen sink installation project, we hope you feel prepared to replace your existing sink. Keep in mind, we have thorough instructions included with every Sinkology sink. But if you need a bit more support, check out the BILT Intelligent Instructions® app. This interactive app provides step-by-step installation support specific to our Sinkology sinks. We love how user-friendly the BILT app is. It helps homeowners of every skill level take on their home improvement projects. After your successful install, share a photo of your new undermount kitchen sink with us on social @Sinkology with #MyUndermountSink. Still looking? Browse through our Sinkology undermount kitchen sinks on our website. For more helpful how to’s, follow us on Facebook, Houzz, Pinterest or Instagram. If you are looking for personalized questions about your sink installation progress, contact us here. _____________________________________________________________________ If you have any additional questions during your search for the perfect copper, fireclay farmhouse sink or crafted stainless steel sink, our Sinkologists are here to help. Contact us or follow us on Facebook, Houzz, Pinterest, Instagram, or TikTok for more helpful tips and design ideas. The post Undermount Kitchen Sink Installation 101 appeared first on Sinkology. Via https://www.sinkology.com/blog/undermount-kitchen-sink-install-101/ The classic farmhouse kitchen sink style has been gracing our kitchens for years. And we wouldn’t have it any other way! With its expansive basin and striking apron front, what’s not to love about farmhouse kitchen sinks? Sinkology offers more than one farmhouse sink to suit every homeowner’s style. But what exactly sets each sink apart from the others? Today, we share three of our customers’ favorite fireclay sinks.
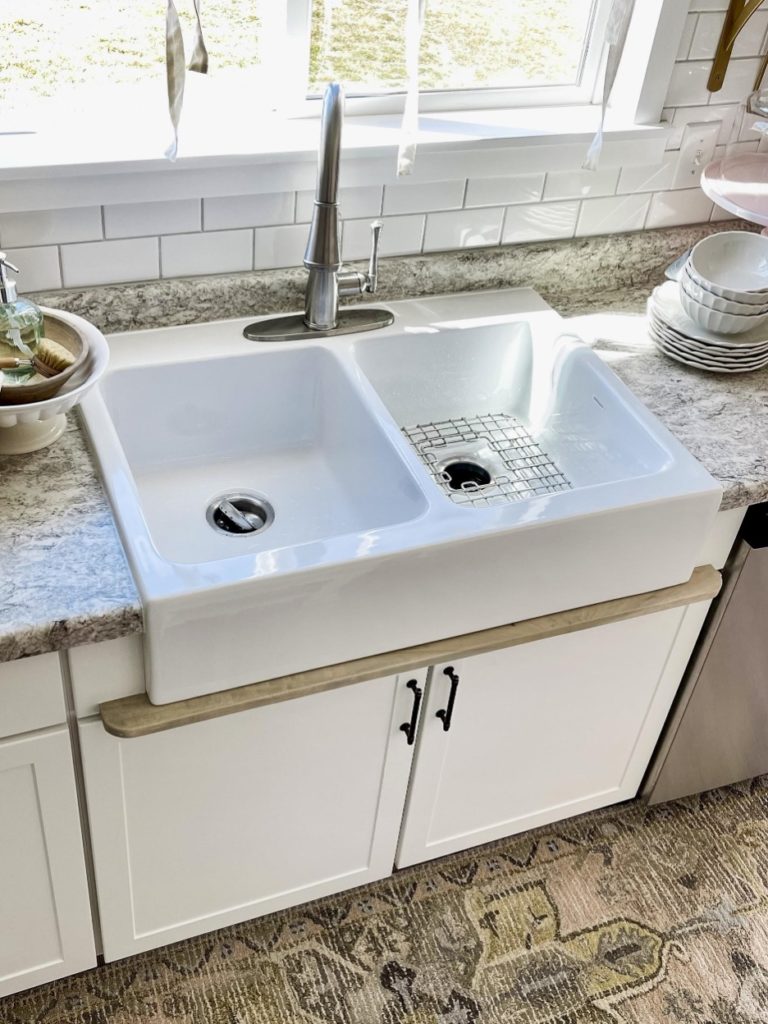
Bradstreet IIThe Bradstreet II Fireclay Farmhouse Kitchen Sink is a 30” sink with a fresh white finish. Its undermount mounting fits flush to kitchen countertops for a seamless look, which shows off the farmhouse style apron-front beautifully. As part of the INSPIRE Fireclay Kitchen Sink Collection, the Bradstreet II is an eye-catching centerpiece that truly inspires. Though beautiful on its own, we offer the Bradstreet II in convenient All-In-One Kits with coordinating accessories as well as our Bradstreet II Workstation that comes with a fit-to-size cutting board and bottom grid. What we love most: Its big bowl with ample space for cleaning all the things. With its crisp corners and easy-to-clean surface, along with the sleek undermount, you can easily wipe all your kitchen messes down the drain.
JosephineThe Josephine Quick-Fit Drop-In Fireclay Farmhouse Kitchen Sink is our most versatile and most DIY-friendly sink. Sinkology customers have loved the Josephine from the start. It’s such a customer favorite that we created more than one rendition of this fan favorite. The Josephine is available in both 34” and 26” sink sizes as well as vibrant colors including Oceanside Matte Blue, Candy Apple Gloss Red, Tea Kettle Gloss Black and Morning Latte Matte Tan. And the options don’t stop there. Like the Bradstreet II, we decided to create a Josephine Workstation to make everyday kitchen work as easy as the install. What we love most: Josephine’s DIY-friendly Quick-Fit Design. No matter what shade you choose, the retrofit installation style will help you make the fastest upgrade. With the drop-in mounting, you won’t need to mess with existing cabinetry to get the same elegance and function you expect from any Sinkology sink.
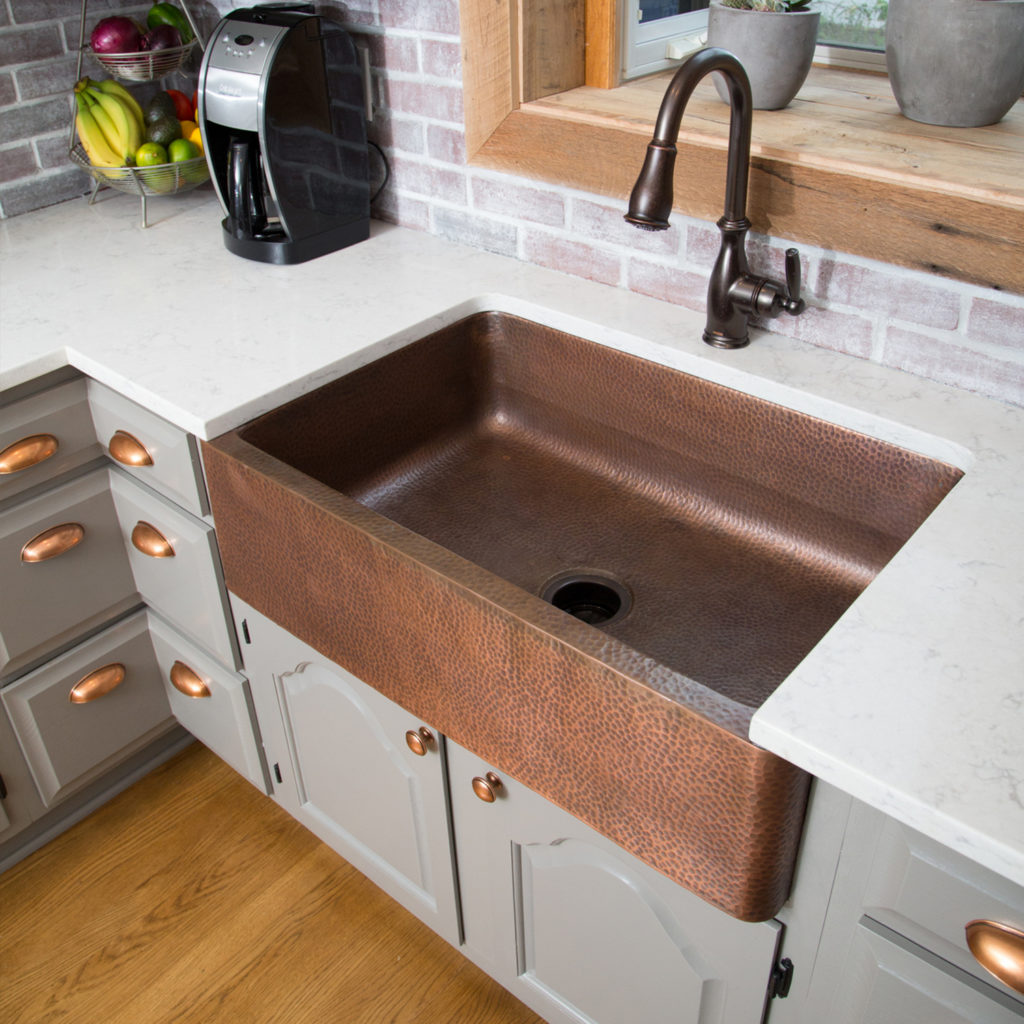
AdamsThe Adams Farmhouse Copper Sink brings the best of all that Sinkology has to offer in one sink style. The apron-front look and natural copper merge to bring a sink that is both unexpected and classic at the same time. Available in two sizes, as well as both single bowl and double bowl options, the Adams has it all. To complete the look, we’ve curated All-In-One Kits with the Adams, including the Adams 33” Farmhouse Sink with Bridge Faucet and Strainer Drain and Adams 33” Double Bowl Farmhouse Sink with Canton Faucet. What we love most: Most farmhouse kitchen sinks come in a crisp white color. But there’s really nothing more beautiful than seeing this beloved silhouette in gorgeous copper that only gets better with time. Every one of our farmhouse kitchen sinks are guaranteed not to chip, crack, stain or rust with our Sinkology Lifetime Warranty so you can enjoy your sink longer. Are you a fan of the Sinkology farmhouse kitchen sink? Show us your sink @Sinkology. _____________________________________________________________________ If you have any additional questions during your search for the perfect copper, fireclay farmhouse sink or crafted stainless steel sink, our Sinkologists are here to help. Contact us or follow us on Facebook, Houzz, Pinterest, Instagram, or TikTok for more helpful tips and design ideas. The post Farmhouse Kitchen Sink Spotlight appeared first on Sinkology. Via https://www.sinkology.com/blog/farmhouse-kitchen-sink-spotlight/
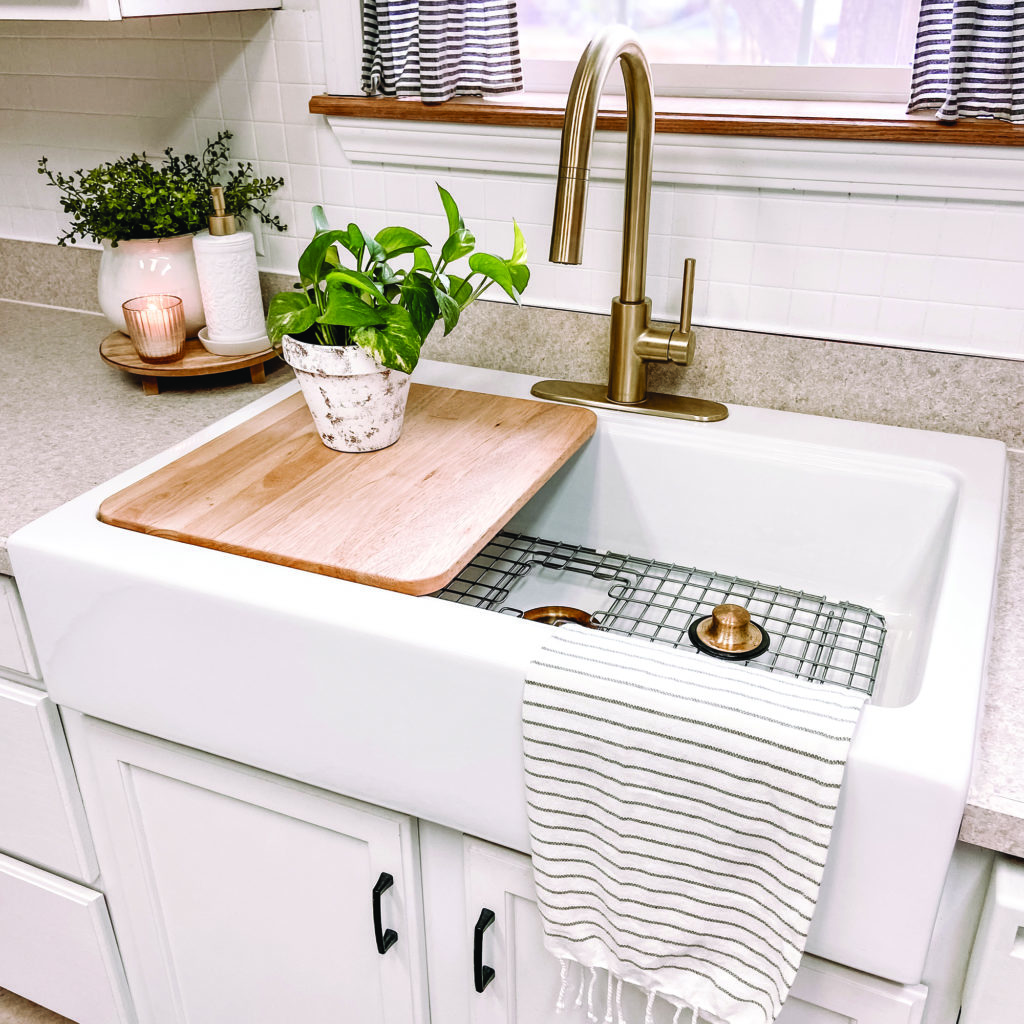
As the kitchen’s central hub, the kitchen sink is where we get it all done. From daily family dinners to special events with guests, we know that the quality of a sink can make all types of work in the kitchen enjoyable or a real struggle. Don’t waste another minute of your day in the kitchen with a lackluster sink setup. With the Josephine Workstation, even the biggest kitchen to do’s become a breeze. We designed this workstation with you, our customers in mind, starting with the sink itself. We chose the Josephine fireclay kitchen sink because it is a favorite among Sinkology customers, and with good reason, too. The Josephine is built to withstand workloads of all size. It’s handcrafted with our very own, incredibly durable SureFire® material that’s shaped into a beautiful apron front design that you can’t ignore. Plus, its thick, protective gloss finish provides even more resilience than fireclay alone. This durable combination is especially helpful when a sink is used as a kitchen workstation. With the Josephine Workstation you can: 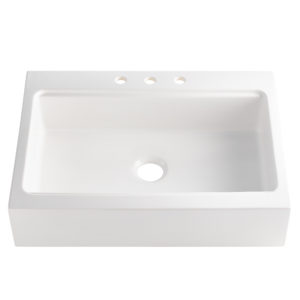 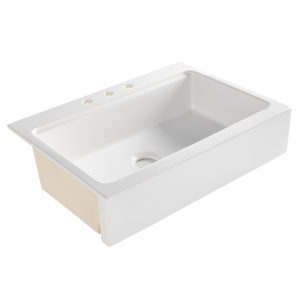 
Tackle the biggest cleanups in the extra-large basin.The 34” sink simplifies soaking and scrubbing the largest pots and pans as well as the biggest stacks of dishes in the deep basin. The bowl size alone is 30.7” x 17.9” x 9”, meaning any mess is kept isolated in the bowl, rather than on the surrounding countertop or your beautiful backsplash. Not only is cleaning up in the sink simpler, cleaning up the basin itself is equally as easy with our famous fireclay. The special protective gloss finish we mentioned before allows you to simply clean your sink with just some warm soapy water.  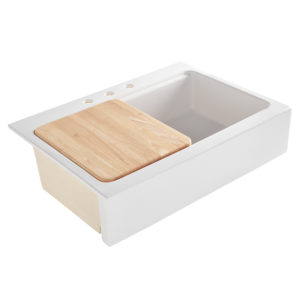 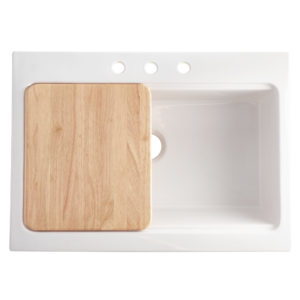
Keep countertops clear with the included cutting board.The Josephine Workstation comes with a fit-to-size cutting board. This gorgeous light wood grain board is made of durable hevea wood, which is known for its natural resistance to scratches. So, no matter how much chopping you do daily, your cutting board will stay looking like new longer. What sets this workstation apart from other cutting board-sink combos is that the cutting board fits snugly within the Josephine sink. We added a built-in ledge that holds the cutting board securely in place. This ledge runs along the length of the sink so you can work wherever it’s best for you.
Enjoy your sink sooner with easier installation.As part of the Sinkology ELEVATE Collection, the Josephine Workstation can be installed with Quick-Fit installation. This retrofit installation method allows you to install your new sink with minimal modifications to your kitchen cabinets and countertops.
Customize your workspace to suit your needs.The Josephine Workstation features three pre-cut holes so you can add attachments that will support the way you work. Whether with a side spray or two-handle faucet, you can customize with quality accessories. We recommend the kitchen disposal flange so you can send food debris that’s left over from chopping on the cutting board down the drain. How will you work it with the Josephine Workstation? Share a shot of your workstation in action with us on social @Sinkology. _____________________________________________________________________ If you have any additional questions during your search for the perfect copper, fireclay farmhouse sink or crafted stainless steel sink, our Sinkologists are here to help. Contact us or follow us on Facebook, Houzz, Pinterest, Instagram, or TikTok for more helpful tips and design ideas. The post Work It With Our Newest Workstation appeared first on Sinkology. Via https://www.sinkology.com/blog/work-it-with-our-workstation/ We at Sinkology love a good sink accessory, especially when it helps in more ways than one. That’s why we love kitchen sink bottom grids. What exactly is a kitchen sink bottom grid? As the name might give away, this sink accessory is placed at the base of the bowl to protect It from everyday use. It’s a beautiful addition to sinks in every finish and incredibly protective for even the highest quality sink made with from the strongest materials. If you’ve never tried this sink saver, keep reading. You might find that this piece is perfect for you. Some may believe that kitchen sink bottom grids are unnecessary. After all, they’re hidden away at the bottom of the basin, out of sight. But we’re certain the following three types of people can’t live without them: 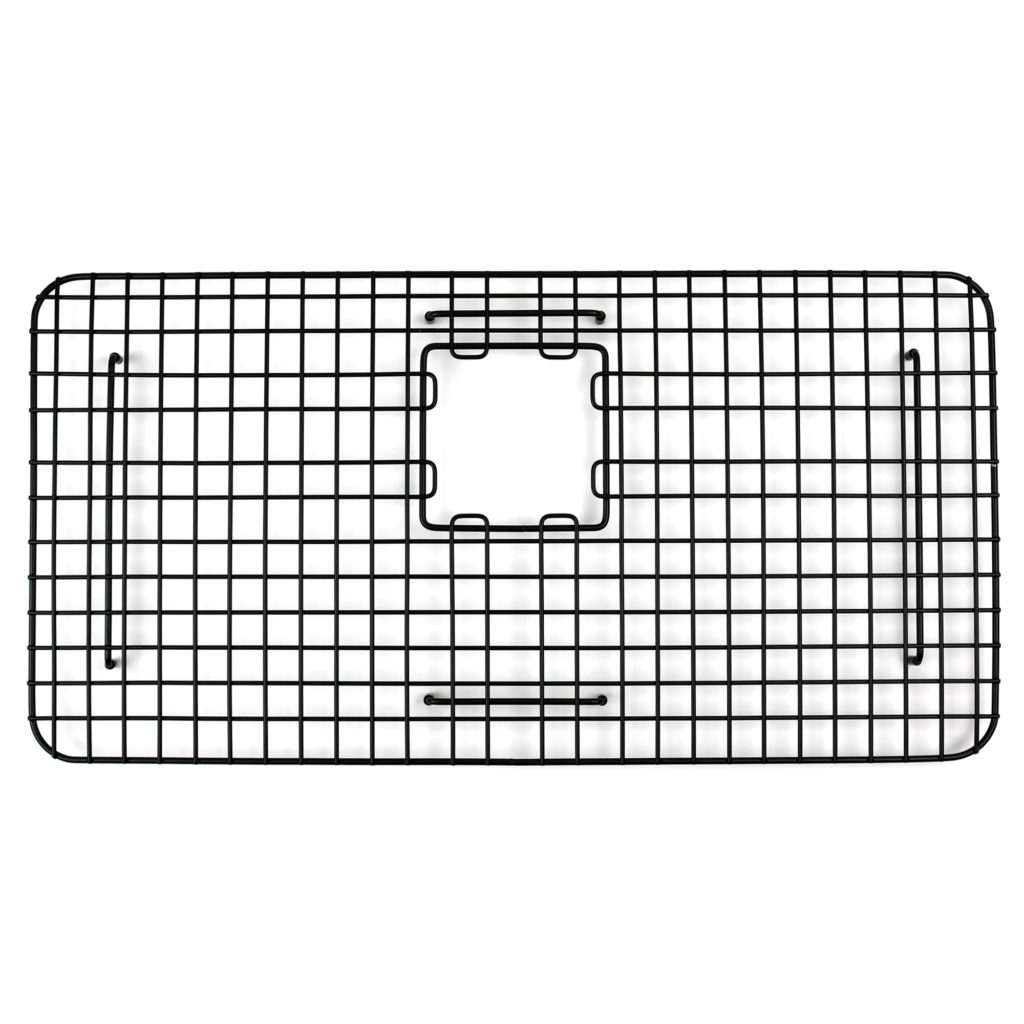 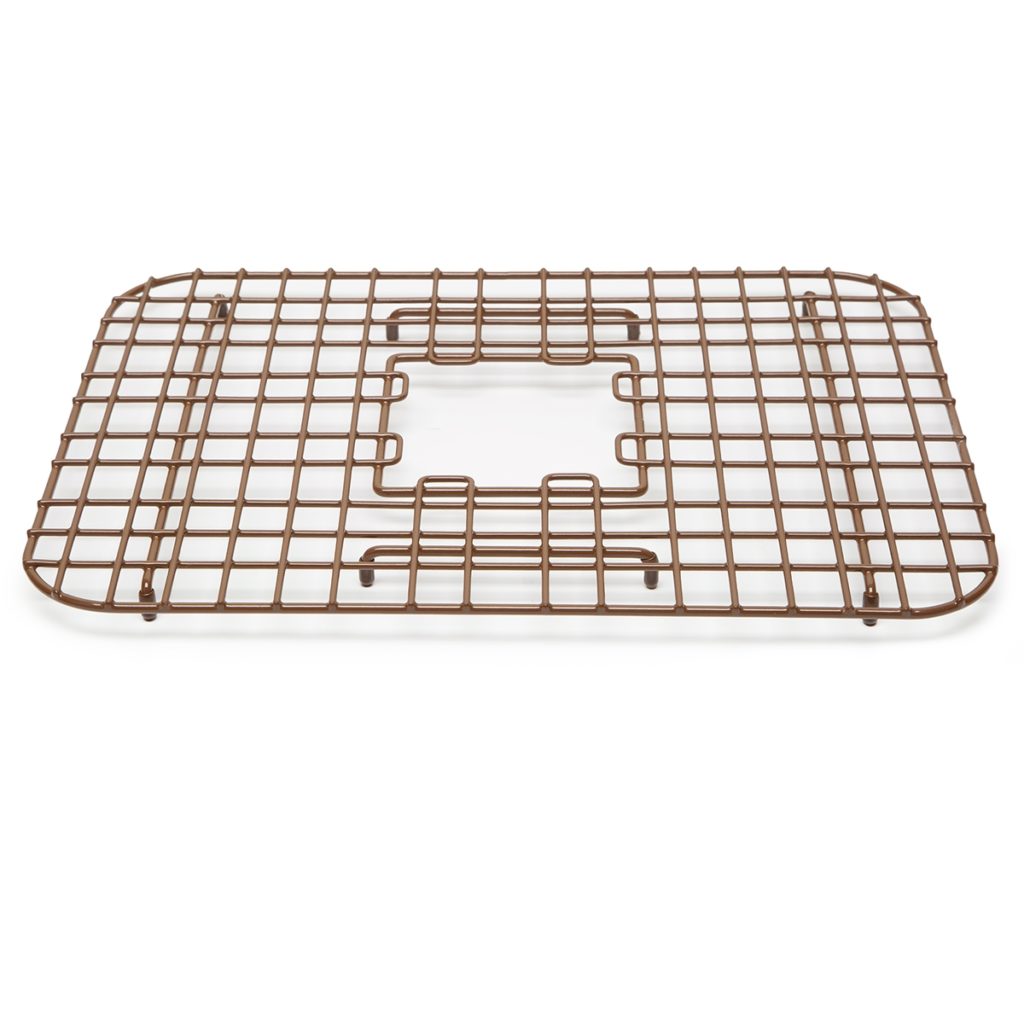 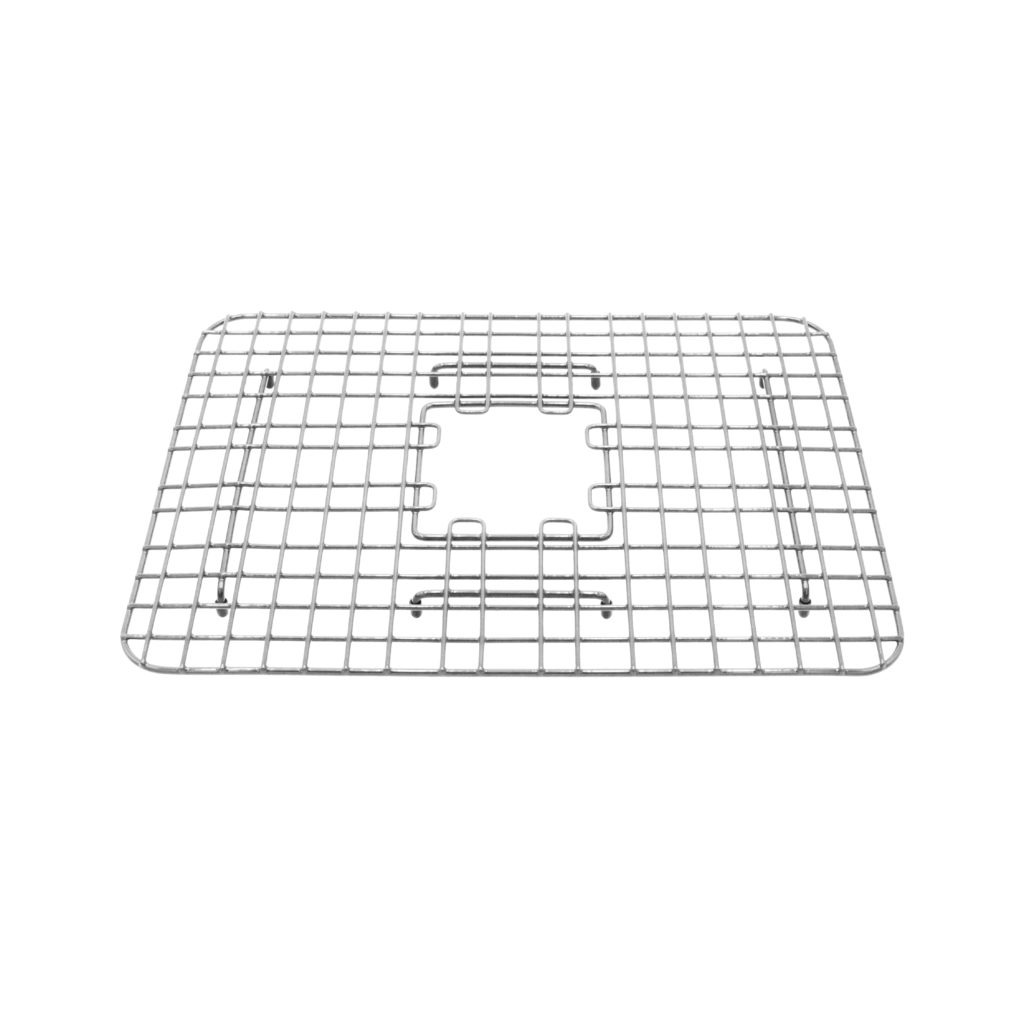
Parents Parents, especially moms and dads of little ones who have irregular sleep schedules, love how this accessory buffers the sound of dishes clanking in the sink. Even disruptive noises that come with washing the biggest pots and pans are muffled by a kitchen sink bottom grid, helping everyone enjoy more restful days and nights. Really, anyone living with a light sleeper or someone working the night shift will benefit because it keeps the high-traffic kitchen open any time of day and the home (relatively) disturbance-free.
Perfectionists Perfectionists appreciate how a kitchen sink bottom grid prevents pots and pans from scratching their beloved sink basin. This removable piece creates a barrier between the sink and piles of dishes, even the thickest, heaviest cast iron skillets won’t scratch the surface. Not only do these grids protect the kitchen sink finish so it can stay looking its best for years to come, but they also make a perfectly beautiful addition, too. We love the look of the grid’s clean lines that show off the sink’s silhouette. And you’ll love how Sinkology offers an array of sizes, styles and shades to suit any type of sink in all kitchen styles.
Germaphobes Germaphobes love how this attachment keeps their kitchen sink cleaner. This add-on prevents large debris from getting left in the sink or going down the drain, making everyday cleanup easier! A simple rinse-off is all it takes, even in the busiest kitchens. When it’s time for a deeper clean, you won’t need a lot of elbow grease to clean up the grid. Our kitchen sink bottom grids are dishwasher-safe, so they stay looking as pristine as the kitchen sink. Even if you don’t have young children at home or are fine with a little bit of a mess, your kitchen sink will love the addition of a bottom grid. Just be sure to find one that is fit to your sink’s size. Scroll through our accessories page to see the options available for your existing Sinkology sink. From classic stainless steel to modern matte black, there’s sure to be one to suit. Need a bit of inspiration? Check out our kitchen sink bottom grids in our curated All-In-One Kits and discover which finishes pair best with your kitchen’s sink, faucet and drain combination. _____________________________________________________________________ If you have any additional questions during your search for the perfect copper, fireclay farmhouse sink or crafted stainless steel sink, our Sinkologists are here to help. Contact us or follow us on Facebook, Houzz, Pinterest, Instagram, or TikTok for more helpful tips and design ideas. The post Kitchen Grids: Who Needs Them and Why? appeared first on Sinkology. Via https://www.sinkology.com/blog/kitchen-grids-who-needs-them/
One of Sinkology’s core values is to keep our products accessible, meaning easy to find and easy to buy. And while direct purchasing on our website isn’t available (yet!), we partner with some of the world’s largest retailers to make sure you have quick access to your favorite kitchen and bathroom sinks. If you’ve spent time browsing Sinkology products on various websites, you may find that prices for the same product fluctuate from store to store. So, what gives? Cost Variables Once the sink goes to our retailer partners, there are additional costs involved that may impact the final price you pay. It becomes a combination of the price of our sink plus whatever additional costs a retailer needs to cover to make the product accessible to you. This can include stocking fees, marketing, store management, shipping, and of course the staff that help you buy the product. While some retailers buy enough of our product to get a discount on bulk purchasing, others buy just enough to meet current demand. The end result is that there may be some variations in prices for our products depending on which retailer you’re shopping with and where you’re shopping, as in-store pricing and online pricing can also differ.
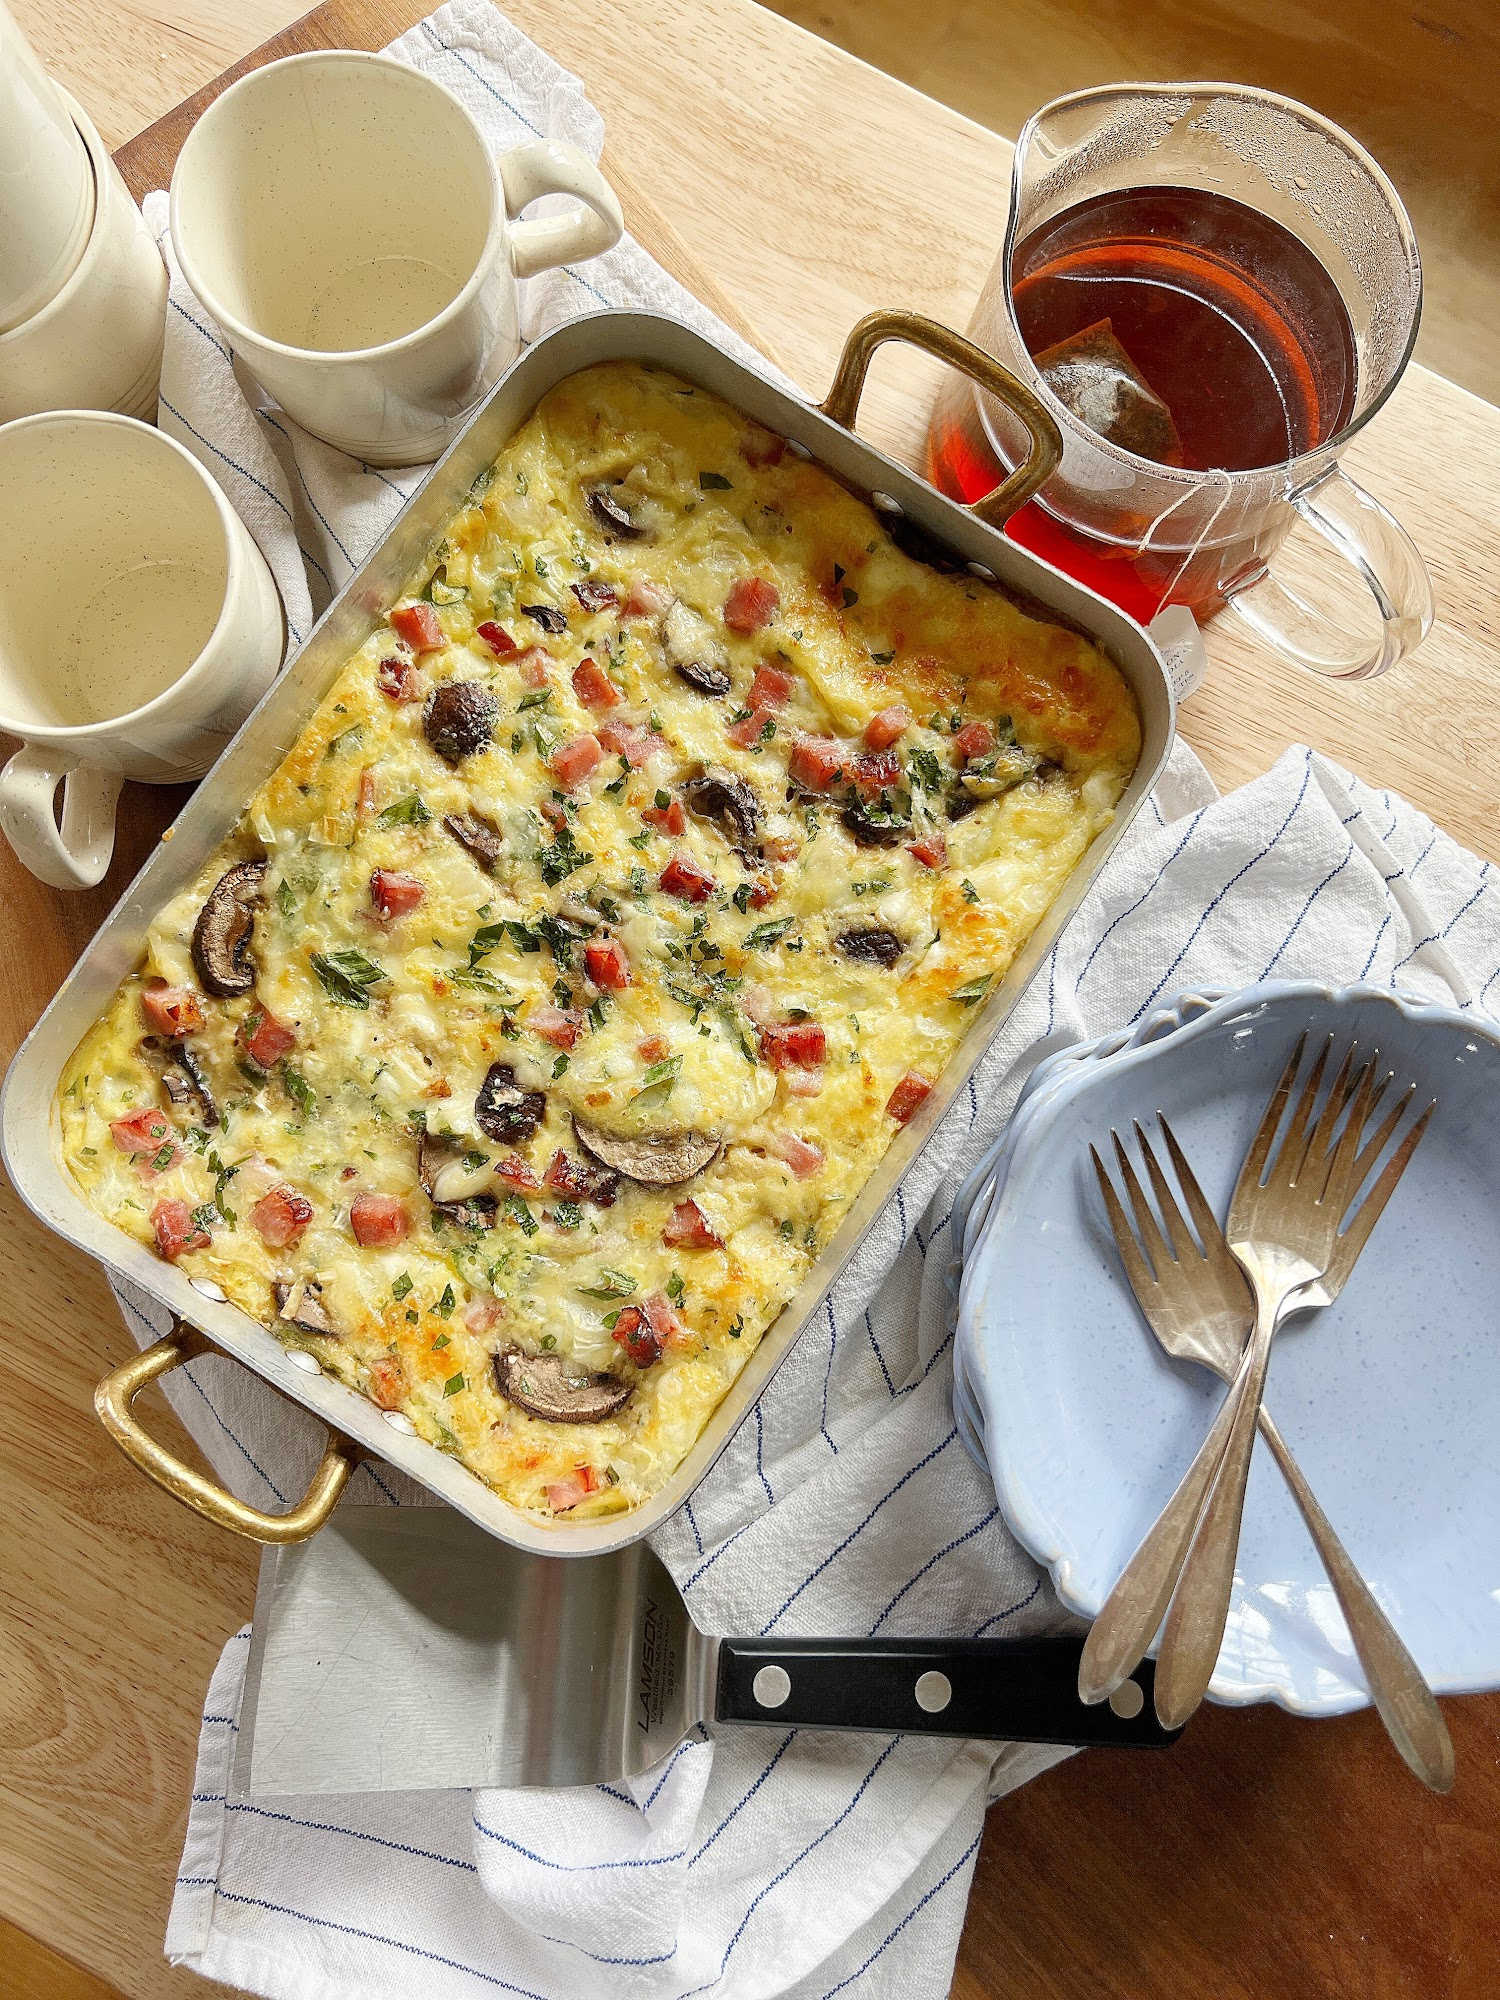
One Consistent Guarantee: Quality _____________________________________________________________________ If you have any additional questions during your search for the perfect copper, fireclay farmhouse sink or crafted stainless steel sink, our Sinkologists are here to help. Contact us or follow us on Facebook, Houzz, Pinterest, Instagram, or TikTok for more helpful tips and design ideas. The post Why Product Prices Vary appeared first on Sinkology. Via https://www.sinkology.com/blog/why-product-prices-vary/ Sinkology is proud to present Emily Schuermann, our food-loving guest blogger who runs Food for a Year. Emily is here to share some recipes she has created exclusively for the Sinkology blog that reflect her view of a copper sink: simple, timeless, affordable, and beautifully rustic. I love a good egg casserole and this Ham & Swiss Egg Casserole recipe is at the very top of my “favorites list”. Not only is it extremely easy to make, it’s absolutely delicious!
There are a couple of details that make this recipe particularly good ::
Here’s what you’ll do – start by whisking the cottage cheese and eggs together. Then add in the remaining ingredients, saving back just enough of the herbs, ham and cheese for the top of the casserole before baking.         
Gently fold in the mushrooms (because they are prone to crumble) and then pour the mixture into a prepared baking dish.
Bake until the center is firmly set and the top is beautifully golden.  
One tip that makes this recipe especially easy? When having Baked Ham for dinner, always save back a few cups of diced ham. Freeze in one cup portions and use for bean soup or pasta or this breakfast casserole. |
About Us
Superior copper sinks and home design products, thoughtfully handmade by real people for real people, at the best possible price. Follow Us On
YouTube Google+ Google Calendar Blogger Google Drive Gravatar WordPress Tumblr Diigo Quip Feedspot Evernote Flickr Specific Feeds Nimbus Note Getpocket Instapaper Trello Toodledo Dropbox Newsblur Feedage Inoreader Alternion Todoist Postach Google Site Digg Disqus Medium Soundcloud About.me Scoop.it Branded.me Orcid Bravenet Behance Brandyourself Ted paper.li ArchivesNo Archives Categories |


 RSS Feed
